Hello, welcome to iMovie Tutorial For Students. Yesterday, I just got a question from my daughter, about a cool, easy and free video editor. There are several names that I recommend her, namely Power Director, Splice, and iMovie. The second question arose from her, “which of the three have fewer limitations, including watermarks.” And that leaves the answer, “iMovie!”.
I remember once I had a very thick iMovie tutorial book (which I forgot which version), and its contents discuss things beyond the use of iMovie itself.
Yes, we know that iMovie is an easy-to-use app. But to get good content that will be displayed in it is difficult. That is what I will summarize and discuss in the iMovie Tutorial For Students series with the additions many by my own experiences.
Also, check how to make money from your videos.
iMovie comes in both desktop and mobile (iPhone and iPad) versions, but in principle, their features are the same. I will set an example using both alternately. I hope this will not be confusing. If it turns out this is confusing, please contact me, and I will guide you online for free.
iMovie tutorial for students is easy to understand but hard to master (well, not that hard). I usually use iMovie myself when I’m running out of resources or just too lazy making a “professional” editing for basic needs, such as wedding and other non commercial event videos.
iMovie Tutorial For Students Will Be Covering
How-Tos
- Choose between new Movie and new trailer
- Create New Project and importing clips
- Add clips to project
- Split clips
- Adding Media, Audio, Titles, Backgrounds, and Transitions
- Superimpose
- Exporting videos
More How-Tos
- Changing the clip speed
- Shoot the video
- Dynamic framing
- Playing with audio
- Collaborating with Final Cut Pro X
Understanding The Terms Used
- Non-Linear Editing
- Movie clips
- Timeline
- Movie Format
- Library, Projects, Theater
- My Media, Audio, Titles, Backgrounds, and Transitions
Most of the topics above will be easy to apply on both desktop and mobile version of iMovie.
Let’s Start Our iMovie For Students!
How-Tos
Choose between new movie and new trailer
In the very beginning of using iMovie, you will be asked if you want to make the new movie or new trailer. Both are great for their own use. In fact, if you choose to make the new trailer, you don’t even need to continue writing this tutorial, that’s because everything will be self-explanatory right within the new trailer section. The New Trailer even gives you a storyboard to follow. Everything is focused and aimed to a certain storyboard. That includes the framing, duration, and songs. Cool!
However… That’s just that about using The New Trailer. You have nothing to tweak and there is no post-processing that might actually improve your video.
On the other hand, choosing new movie will give you a blank canvas to start everything from a scratch. And this will give you more control of whatever storyline you have in mind.
Hotkeys: Cmd N for New Movie, and Cmd Shift N for New Trailer.
Next in iMovie Tutorial for Students:
Choose between new Movie and new trailer- Create New Project
- Add clips to project
- Split clips
- Adding Media, Audio, Titles, Backgrounds, and Transitions
- Superimpose
- Exporting video.
Create new project
So, you decide to continue reading after all, great!
As mentioned above you will have to manually import your video clips to iMovie. Some cameras are supported for automatic importing. Just plug your camera into your MacBook or iMac. If auto importing is not supported, you can manually transfer your clips to your Mac, and then click the import button on the upper left of your screen. Then browse to your clips folders on your Mac. Then click “Import Selected”. Or use the software provided by your camera manufacturer.
As for mobile user, you can first import your videos from your Photos gallery. You can also import them using third party software comes with your camera. I’m using Sony A6000, therefore I use PlayMemories to transfer my clips to my Photos gallery, and then to iMovie.
If you’re using both, in this case, you shot and edit your videos using your iPhone and decided that you need larger screen, you can easily import the projects by using the “Import iOS iMovie Projects”

Next in iMovie Tutorial for Students:
Choose between new Movie and new trailerCreate New Project - Add clips to project
- Split clips
- Adding Media, Audio, Titles, Backgrounds, and Transitions
- Superimpose
- Exporting videos
Add clips to project
The clips in our library are not ready to use unless we put them in a project. A project is where we put some clips in certain order, add some texts etc and then export them as one finished movie.
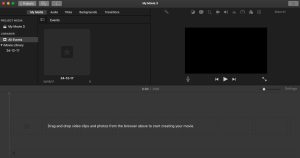
Click on the big plus button to open a new project if it’s not open yet (a project is either a Movie or Trailer you choose in the earlier step). Choose the Movie for now. You will then be directed to a blank movie project.
Click on the Arrow Down button on the upper left of your screen. Choose the source of your clips. That would be where you import the clips earlier. Select multiple clips at once by holding Cmd key and clicking the media you want to import. Click “Import Selected”.
You then can choose the media in your Movie (you imported earlier specifically for this project), or by choosing the media in your Library (the universal media collection from other projects).
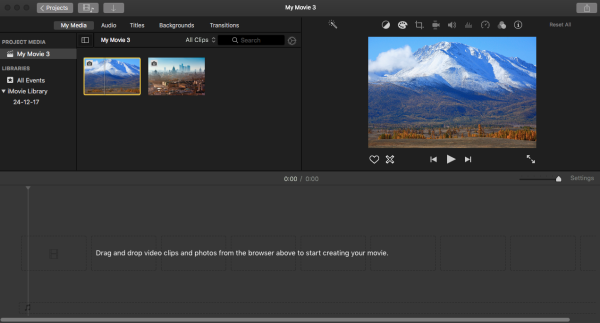
And this is where all the fun starts! Start dropping your clips into the timeline below and order them to your likes. Well, the best way is that you made the storyboard first.
Next in iMovie Tutorial for Students:
Choose between new Movie and new trailerCreate New ProjectAdd clips to project- Split clips
- Adding Media, Audio, Titles, Backgrounds, and Transitions
- Superimpose
- Exporting videos
Split Clips
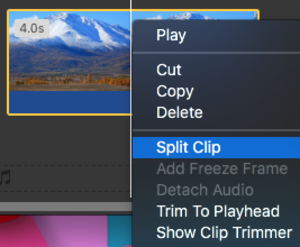
We need to split clips to continue the clip to another clip in order to make a smooth and fluid movie. Or we can split clips to cut away the bad takes. The way to do this is by right-clicking on the clips in the project you want to split and then choose split clip. The clips will then be split in two, you can then delete the part you don’t use or put other media in between.

The result of clip splitting
You can also trim the clip by right-clicking the clip on the place you want it to get trimmed, then choose trim. The clip will then be cut and leave the untrimmed part.

Result of trimming
Next in iMovie Tutorial for Students:
Choose between new Movie and new trailerCreate New ProjectAdd clips to projectSplit clips- Adding Media, Audio, Titles, Backgrounds, and Transitions
- Superimpose
- Exporting videos
Adding Media, Audio, Titles, Backgrounds, and Transitions
First, I want to give you head tips that you can easily drop the new element (media, audio, titles, backgrounds, and transitions) on where the old one is. So, you don’t have to remake it when something wrong happens Just drop the new one and choose Replace from start.
Adding media on iMovie is basically the same. You can do it by drag and drop the movie elements on the timeline. Remember when we split the clip into two parts? Now we can choose and then drag the media from library to the space between the two clips (or anywhere else).
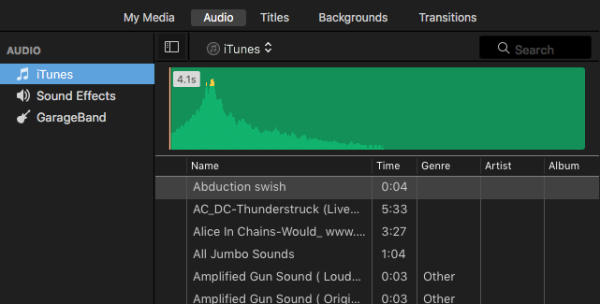
For the audio section, you can choose between your iTunes songs, Sound Effects, and Garage Band (if you have it). You can preview the audio by clicking on the play button. Go on and try to experiment with it. There is no other way to know how fun movie editing is besides trying it yourself.
As for the titles section, you can choose from many premade text selection there. When you drop it beside the clips, it will be a title alone and will be treated as other iMovie media. When you drop it on the top of other clip, it will be a text overlay.

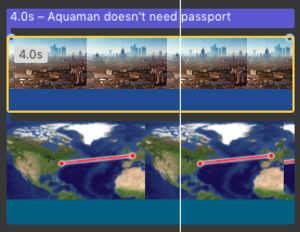
See that it has 4.0s written on the text, that’s the duration of the text (4 seconds). You can play with the text duration by dragging the edge of the text. Please note that some texts work best in their default setting.
You can change the text font and content by clicking it on the preview section.

For background, you can choose Maps and Backgrounds. Like the others, you can simply drag and drop it on your timeline, but this time, under the other clips (hence, they are called backgrounds) while it’s not actually necessary always be a background. Maps are something very sophisticated in iMovie. Just check the video below…
Cool, huh? All I did was inserting the location and destination. Try it! Make your own Indiana Jones movie.
The transition is something very tempting but also something you must have considered not to overuse. They give appealing effects for the movie maker, but they also tend to sicken the viewer when they’re overused. Just check most big screen movies made by big studios. They barely use any transition at all, except for the opening and sometimes the closing. The most popular is crossfade. No one ever had enough with this one.
Same way to use transition, drag, and drop.
Pay attention that transition will consume the last part of the previous clip and the first part of the next clip. Make sure that you don’t “kill” your best movie part in the transition.
Next in iMovie Tutorial for Students:
Choose between new Movie and new trailerCreate New ProjectAdd clips to projectSplit clipsAdding Media, Audio, Titles, Backgrounds, and Transitions- Superimpose
- Exporting videos
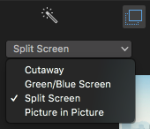
Superimpose
Actually, there is one word that will make you understand what superimpose is:
Green Screen!
Even though that word alone is a supersimplification, green screen, and blue screen is what most people understand (and wish). And, iMovie has that!
You can choose from:
- Cutaway
- Green/Blue screen
- Split Screen
- The picture in Picture.
You will have to stack two movie clips, click on the top clip (the superimpose menu won’t appear unless you click on the top layer clip), choose the option and see the magic happen.
Note that if your green screen failed, most probably is that iMovie doesn’t consider your screen green or blue enough. Use a well-lit background in the making.
Next in iMovie Tutorial for Students:
Choose between new Movie and new trailerCreate New ProjectAdd clips to projectSplit clipsAdding Media, Audio, Titles, Backgrounds, and TransitionsSuperimpose- Exporting videos
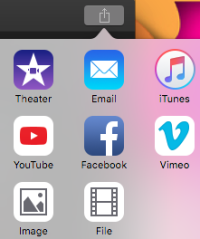
Exporting Videos
Your masterpiece won’t go anywhere unless you export it. Click on the Share Button on the top right of your screen, and choose where you want to put it. The picture below shows you the option:
Next in iMovie Tutorial for Students:
Choose between new Movie and new trailerCreate New ProjectAdd clips to projectSplit clipsAdding Media, Audio, Titles, Backgrounds, and TransitionsSuperimposeExporting videos
And, Exporting Videos concludes this part. Congratulation, you have master the first part!
Also, check how to make money from your videos.
More How-Tos
-
Changing the clip speed
You can change the movie speed to add the dramatic effect by right-clicking the clip and choose “Show Speed Editor”. It will add a circle button on your clip. Drag the button to the left in order to speed up your clip, and drag it to the right to slow your clip down. Please note that slowing down a clip that’s taken by the regular camera will make the clip looks choppy.
-
Shoot the video
* Try to use tripod or stabilizer all the time. It’s better to move the video in editing rather than stabilizing the video using a software. It can come up as a wavy clip.
* If you plan to make a zoom, shoot from a wider angle, then zoom in iMovie.
The quality will be reduced due to the digital cropping, but doing the opposite (shoot in close up then zoom out) is impossible since iMovie has nothing to fill the blanks with.
My suggestion is, don’t use zooming on iMovie or zoom while filming instead.
-
Dynamic framing
Shoot the same scene several times using different angle and different zoom to get various framing. This will add more flavor to your movies.
For example:
* Shoot people A and B talking from people B’s back, keep filming until the conversation ends. Don’t stop when people B start talking.
* Shoot people them both talking from A’s back, keep filming until the conversation ends. Don’t stop when people A start talking.
* Shoot them both from the wider angle so the viewer can see both talking at the same time.
* Edit and sync all clips in iMovie.
-
Playing with audio
A movie without a back sound is as bad as a movie with wrong back sound. My suggestion is for you to start hunting the sound effect or install Garage Band and start making your own back sound. You can also use a professionally made song provided by Bensound.com. Or, you can add the song later on YouTube if you’re making YouTube videos. Please note that the existing sound can be overwritten by the YouTube song.
-
Collaborating with Final Cut Pro X
When you think iMovie is just not powerful enough for you, you can collaborate it with Final Cut Pro X (FCPX). You can buy FCPX on the AppStore and then import your project from FCPX. My suggestion is by using both. Work with the storyboard with iMovie and then add more effects in FCPX.
Understanding The Terms Used
-
Non-Linear Editing
In the past, an editor had to scrub the film roll forward or backward to reach the frame that he wanted to edit during the process of making when the video yet using the digitally now. Changes made is to modify the frame at the source. It is not how it works in the digital era as it is now. And that also applies to iMovie. The editor, or we, can edit the frame without changing (non-destructively) on the video source (video file).
The results shown by the video editor to us are the video frames that have been flavored with effects and other modifications by the computer and not the original video frame. We refer to this process as non-linear editing.
-
Movie clips
The movie is a movie when it’s done editing, polished and ready to launch. A movie can consist of hundreds of smaller parts named clips. The word “flix” is sometimes used replacing “clips”, both mean the same. The videos you shoot on your phone will be called clips when imported to iMovie.
-
Timeline
The timeline is where you “cook” your video. It moves from left to right, where left is the start of your project, and right is the end of your project. Everything aligned in the timeline will appear at the same time in the movie preview.
-
Movie Format
There are several movie formats known till date, and it keeps increasing in number. The most popular movie formats are Mov, Avi, Mpeg (mp4 etc) and the new WebM.
That concludes iMovie Tutorial For Students. Thank you for reading, and see you on the next tutorial.